Background
Git is a system designed to efficiently manage source code. Its core functions include version control, backup, and collaboration. In this post, we will focus on the version control functionality of Git.
Managing versions with Git involves three key steps:
- Creating a repository.
- Generating new versions when changes occur.
- Reverting to previous states when necessary.
This post will cover repository creation and version management.
1. Creating a Git Repository
When starting a new project, we typically create a folder to store files. To manage the files within this folder using Git, we need to initialize a Git repository. Follow these steps:
mkdir project_test  # Create a new folder named 'project_test'
cd ./project_test   # Navigate to the 'project_test' directory

git init  # Initialize a Git repository in the 'project_test' folder
If successful, you will see the following message:
Initialized empty Git repository in C:/Users/project_test/.git/At this point, the directory is ready for Git version control.
2. Managing Versions with Git
2.1 Understanding Git's Structure
Before creating versions, it's essential to understand Git's structure. Git consists of three areas:
- Working Directory: The folder where files are edited and stored.
- Staging Area: A temporary space where files are prepared before committing them to the repository.
- Repository: The final storage area where committed versions are permanently saved.
Git uses the following commands to manage these areas:
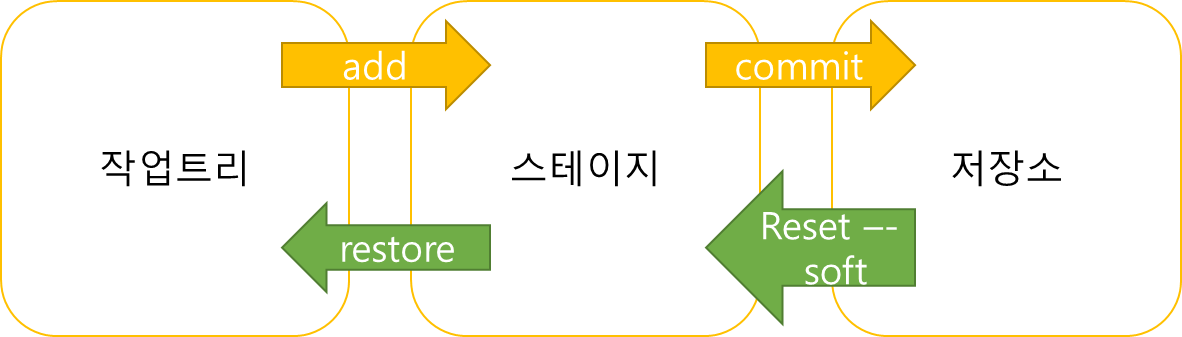
- git add moves files from the working directory to the staging area.
- git commit moves files from the staging area to the repository.
- git restore and git reset help revert changes if necessary.
2.2 Creating a New Version in Git
The process of creating a new version in Git involves checking the status, adding files to the staging area, and committing them to the repository.
Step 1: Check Git Status
git status # Check the current status of the working directoryThis command helps determine whether there are new or modified files that need to be staged.
Step 2: Create a New File and Add It to Staging
vi test.txt  # Create a new file named 'test.txt'
# Enter some content, then save and exit the editor

git status  # Check the status again
Expected output:
Untracked files:
  (use "git add <file>..." to include in what will be committed)
        test.txt
Since this file is new, Git does not track it yet.
Next, add the file to the staging area:
git add test.txt  # Stage the new file
git status  # Check the status again
Expected output:
Changes to be committed:
  (use "git restore --staged <file>..." to unstage)
        new file:   test.txt
Step 3: Commit the File to the Repository
git commit -m "Added test.txt" # Commit the file with a messageAfter committing, check the log to confirm the new version:
git log # View commit historyExpected output:
commit 2a90767a070d85bebdbaa5f54b72b8e5d7043b45 (HEAD -> master)
Author: -----
Date:   Sun Jun 26 14:01:04 2022 +0900

    Added test.txt
Conclusion
- Git repositories allow efficient tracking of file changes.
- Git version control involves adding changes to the staging area and committing them to the repository.
- Key commands: git status, git add, git commit, and git log are essential for managing versions.
By mastering these basic Git operations, you can effectively manage your source code and collaborate with others.
References
- "Git & GitHub Guide" by Easy Publishing
Thank you for reading! 🚀
'프로그래밍 > GIT' 카테고리의 다른 글
| How to Use Git Reset & Restore for Version Management (Undoing Previous Commits) (0) | 2025.03.30 |
|---|---|
| Git Rebase & Squash로 깔끔하게 브랜치 정리하는 방법 (0) | 2025.03.29 |
| What is Git? (0) | 2025.03.23 |
| (3-4) git merge란?(어떤 branch가 남고 어떤 branch가 없어지지?) (0) | 2024.05.16 |
| (2-1) git branch란? (0) | 2022.11.08 |